Saturday, 30 March 2019

Cozy Toes

Hi Loves,

Have you ever been so cold you think you're going to freeze, only to put a sock on and the temperature drops almost instantly?

If the answer is yes. Then these cuties are just what you need.  The idea came when a friend of mine complained about her feet always being cold.

I have made crochet booties numerous times but really wanted to knit this one.  I went to YouTube and browsed around to get the general construction.  I didn't want anything too complicated as these were just for lying in bed or moving around the house.

After watching a few I got my inspiration and set to work. Two hours or so later I have my very first pair.

🤔🤔 I know what you think. "That doesn't look like footwear".  But my friend they will be.

Can you believe it? That somewhat square piece became this masterpiece.

Yes, it did.  I had to jazz them up with a bit of colour.

These were done to fit a size 9-10 lady's feet.  They were just too cute to be for only adults, so I went back to the needles and did a pair for the tiny tots in our lives.


This is the finishing.

But here's where it all started from.


Saturday, 16 March 2019

The Birth

Hi Loves,

I was asked to make a scarf, the customer was very specific in her colours and size...

"I need it to be black with yellow at the very edge, it should be 6" wide and 40 inches long".

Wow!!

I have tons of scarf patterns but as of late the urge to design my own has been getting stronger and stronger. So that's what I did.

I've designed pouches and bags, but never written anything down, even if I replicated it, who knew it was this hard putting your creation to paper?

It normally takes 7-9 months for a baby to be born, but my birth took only a few hours.  My very first written pattern

How it all went down!!!!!

I played around to ensure I got the width correct (6"), once that has been achieved then it's easy peasy, lemon squeezy.

I first thought of making a full seed stitch scarf but after a few rows in, honestly, boredom started to surface.  My lazy inner being started to complain

"This is taking too long". " blah, blah, blah"

Then came Mrs. Enthusiastic screaming in my ear... "HEY, Why not do a few rows of garter stitch". We 🖐🖐 high-five each other and just like that the pattern started taking shape.

Man, I just love my staff (me, myself, and I) hahaha...😜😜😜

I completed the scarf and it was an absolute beauty, but sadly I didn't get to photograph it.  Want to know why? Sure you do.

I have no pics as I did the finishing touches while in a taxi heading to make the delivery.

After making my delivery (she loved it btw), I came home and scribbled some more.  With no picture to post, I had to recreate my masterpiece and that's exactly what I did.  I started doing it in black but thought against it and went for a light green yarn I had in my stash.

The aim was to replicate, type, proofread, export to pdf, and post for sale on Ravelry by January 4th, 2019 (my baby's birthday). It didn't seem possible up to January 3rd but by 10:30 pm on the 4th, with a finished scarf, the pattern is written and pdf ready, I posted my very first pattern for sale (https://www.ravelry.com/patterns/library/garter-seedling-scarf).  2019 is off to a good start.

Now the waiting begins, will people like it? Will they purchase it? Either way, I was bubbling with pride, I finally wrote and posted a pattern.  There is no stopping me now.

The Masterpiece 

Without any fringe or tassel.

Crochet loop stitch finish.

Tassel end

Adding Tassels

Wrap your yarn around a book or piece of cardboard (or anything you desire).  Cut to the length you like and let's get started.

Insert hook

Loop the yarn over the hook and pull it through.

Take your loose end and pull through the opening.

Twist and pull through the opening once more.

Pull to tighten and form a knot, repeat until the entire edge is covered.

How to do the crochet loop stitch edging?


You can watch this video or search " crochet loop stitch" via YouTube and follow along.  This stitch is really easy once you get the hang of it.

Let me know what you think, if you purchase my pattern, please share your finished scarf.


Saturday, 2 March 2019

My Second Attempt.

Hey Loves,

So, prior to making my first ever cardigan (see my Cardigan, Bardigan post), I made the request to test knit Petra Breakstone's cardigan while she was still working on it.  She agreed and put my name down.

The pattern was completed and ready for testing, the Ravelry forum board was ready, the pattern was received via email and now it was time to start.

Pattern read and all seems well until it was time to select needle size 4 (3.5).  I have a size 3.75, 4, etc.  Swatch gave a size of 5*5 and not 4*4... What to do?

I did what was expected... Started my cardigan.  I followed the pattern, and upon reaching a section that would become the sleeves I realize if I followed the pattern verbatim I would not have a good-fitting cardigan.  The decision was made to modify the pattern and this was a really good decision.

The top progressed beautifully and anticipation started rising.  I continued on until I had the length I wanted, and did the edging, and bind-off.

This is only the beginning


Progression 

Part 2

Part 3

Part 4

Part 5


Part 6 ( this is where I made the decision to not follow the pattern)

The stitches for the sleeves were separated and I worked my body until I had the length I wanted. The garter stitch edge was done, I also didn't follow the pattern as I thought 3" of garter would be too much for this short version.

The body is complete.

I worked on the sleeves and again I didn't follow the pattern and made long sleeves, I made my version in short sleeves.  Petra was happy I did, as this showed how diverse her pattern was.

My not-so-willing model 😂

After weeks of being finished, I found my perfect model.  The cardigan fit her perfectly, and I finally got to see my work in all its beauty.

If you wish to make your own cardigan, you can, just follow the link:   https://www.ravelry.com/patterns/library/rondo-cardigan


Saturday, 16 February 2019

Cardigan, Bardigan

Hey loves,

    Since my newfound love  (knitting, just in case you didn't know), I've been leaning more and more towards clothing.  I've been fortunate as a beginner to have been given the opportunity to test knit for a couple designers and so when a customer ask if I could make her a cardigan I was over the moon.

I sent her pics of the ones I had patterns for (not confident enough to design my own.... Yet);

@theeasydesign 

@expressionfiberarts

@hearthookhome 

She chose @hearthookhome's design (a classic cardigan), with yarn in hand I started to make her choice, but it just did not resonate with me (again leaning towards knitting), so I send her another picture (see below) and she loved it.  


Pattern ✔
yarn ✔
needle ✔

With the necessary tools in hand I did my swatch (honestly, don't normally do this), I didn't get a 4" square as I should, instead, I got 4.5". That's good enough for me.  I selected my size and got the ball rolling.  Cast on and then a bummer..... I thought I was following the pattern, wasn't I?  Panick was creeping in, but not today.  Sadly I had to 🐸🐸🐸🐸 (pull out) what I've done so far, but it was worth it.  The pattern started taking shape and as it grew so does my excitement level.

It was not after I basically completed the full length and cast off and was getting ready to do the sleeves, front panel, and neck that disappointment sets in... It's too big😫😫😫. I was going for a 39 bust for the finished product but mine was measuring 44" without the front panel being added.

Then I thought... If I was doing the size M (39" bust) and got the size 2Xl... Then doing the XS might work.  I didn't" bother to frog the first one, I just cast on the other size with what little thread I had left.

I worked so hard to finish my cardigan, all while praying it turns out nice.  I completed the top and started the front panel... Following the pattern to the tee, but with the difference in yarn weight that would not work.  Instead of doing 2 full repeats and then the half repeat, I did only one.  After many, many, many hours of continuous work, it's finally completed.

It looks amazing but felt sooooo bulky. Then my eureka moment came sometime after midnight.......

Steam press... Awesome right...

I pinned the pattern in place, placed a cotton blanket over it, and steam pressed, and OMG, it felt ooooh soooo soft. It was at that very moment I felt the warmth of accomplishment.

I hang it on a wire hanger and went to bed, praying she liked it.


I didn't take any measurements, just asked for her bust measurement. 

Look at this back, wow


The first one... Oh so big


This was how it all started.

She loved it, and praised me for being almost accurate when I didn't take her measurement and just went by mere memory. 

This was such an accomplishment for me.


Saturday, 2 February 2019

Winter chills and spills and then some

Hi Loves,


    With the completion of my cowl and scarf, they were delivered.  At first, she was complaining (and my heart sank);

"the cowl seemed a bit big for his little neck" (I tried it on my 2-year-old, thinking to myself)
"the scarf rolls too much" (I blocked it and it looked nice, even so, it's going to wrap around the neck, also thinking to myself).

She took them, paid me and I was thinking so much for my first impression, she's a goner, then a few days after I received a WhatsApp message.

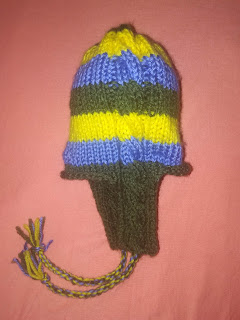
"Can you make the little hats with the ear flaps"
"yes, I can" (even though I have never even tried, but how hard can it be?)
"I want one for my grandson"
"Sure"
"you know what, and one for my granddaughter as she would want one"

Thinking to myself (doing that quite often these days).  Do I have the material as I know that the skein of the stripe was finished?.

I messaged her back;

"I have more of the yarn for the boy's matching hat, but the scarf used the one skein I had"
"Can you find anything to match the colours"
"Oh, sure I can"

I started my research as I had the concept but didn't really know how to execute it.  I watched two YouTube videos, one starting from the top down with it all worked in one and then seamed, the other made 2 ear flaps and then attach while doing the hat (oh, by the way, they were both knitted).  This is where it got tricky (if I had only crocheted the cowl and scarf, this would have been easy peasy, lemon squeezy).

Did I tell you I wanted to make the hat and scarf with the same stitch pattern I used for the cowl and scarf? It's a set, isn't it?  After watching the videos I came to the conclusion that making the 2 ear flaps and then the hat would be easiest.  I started the little boy's hat.  It took me a few short hours to have a finished product.  Grinning from ear to ear, a ran to my neighbour's house to show her my lovely creation (psst, this was after 8 pm.  I felt so accomplished.

Now the most difficult one. sighs..... why, why, why didn't you crochet a scarf... No, you just had to knit with your beginner self.

After doing a bit of thinking, calculating, and more thinking the idea was clear as mud... Sorry meant day.

And after a bit of a challenge, my hat was completed... Now the hard bit. Will my client like/love them...

They were delivered and she did (well I think she does as she hasn't made any complaints to date).


I used the same pattern as the scarf, I just had to modify it to work in the round.


Perfect Fit

It's not her size


Saturday, 19 January 2019

Winter Chills and Spills

Hi my loves,

    A conversation started while test knitting the Fereday Shawl by Petra Breakstone at a women's meeting on a Sunday afternoon.

Potential customer (PC):  Can you make the scarf that goes over your head and hugs your neck?
Me: Oh, a cowl, sure I can.
PC: It's for my grandson who is 2.
Me: ok. no problem.
PC: I'm going to need another for my granddaughter.  She's older so you can make the one that wraps around.
 Me: Sure thing. (all while thinking, here's a chance to really test your skills, Melissa)

My potential customer informed me her grandbabies live abroad (yes, yes, hoot, hoot, my work will be taking a trip, before I do)

No colour scheme provided, no delivery time but I was so excited I went home, search my stash and started thinking of what design should I use.  Should I search the numerous saved patterns I have, should I search Google, YouTube, Ravelry etc, then the thought came, why not make your own pattern.  I decided on the yarn I was going to use, and being that I have never actually made a child size cowl before, I reference YouTube and some patterns I had to assist with sizing.

I have been crocheting for over 20 years but took up knitting over a year ago (and fell in love), so when the option presented itself I decided I was going to knit my very own cowl.  I went for something simple, I cast on the number of stitches needed, did a bit of calculating to ensure my cables (yes I did say cables, and yes I said something simple) would be equally spaced.   To make it more interesting I chose 3 colours, army green, yellow and blue.

After finding my rhythm, in no time my cowl was completed. I felt like a child on Christmas day, sure its just a simple cowl, but I knitted it, without a pattern from someone else.  This was mine.


I now have the tasked of designing the little girls scarf.  I chose a skein of Red Heart super saver stripes.  I needed a nice pattern so decided to scout YouTube, still in the hopes of making my own design.  I stumbled on one of my subscriptions (Knitting Stitch Patterns), I browsed their catalogue and the Flame Chevron spoke to me "pick me, pick me", and so I did.


The video was watched and found to be doable.  I cast on the number of stitches needed for the width I wanted and just like that, knitting had started.  I worked on my scarf and within a day or two, it was completed.

Here it is on the blocking board.

I love the way it turned out and those colour changes.... wow.  There was only one issue I found after completing this scarf.  It rolls a lot (note to self....... do maybe a garter stitch edge).  With both projects completed, it's photo time.  My baby agreed to be my model.

"Peek a boo"

"my neck is so warm"

"I know my hair is a mess, but my mommy made a pretty scarf"

To be continued........

Thursday, 3 January 2019

Bag, bags and more bags

Hey loves,

I was given the task to make a few circular bags, I was shown a sample that was done and was told it wasn't sturdy without being lined but the lining was out the equation for these. I was just to make them but the closures (buttons, velcro etc) will be done by someone else. The threads were supplied and I was on my way home to start creating.

I pondered how  I should really make them, yes, they should all be circular, but should I really make them all the same? 🤔 🤔.   Day 1, 2, 3 and counting... Then my creative juices started to flow and before I knew it, I had a dozen bags made.

The End!!!

Sounds quite simple right?  It really wasn't,  I had to decide which stitch to use, should I do single crochet (sc), half double crochet (hdc) or double crochet (dc)? I played around until a decision was made. Now that I've decided on the stitch/s I'll be using, the next step is deciding what I'm actually going to make, how should I start them, how should I end them, how should they be closed.  If you are a crafter you might have the same feeling I do when working with yarn. The yarn actually speaks to me, it tells me what to make with it just as the material to a seamstress/tailor or the wood to a carpenter.  Some give off a funky more upbeat vibe while others are more subtle.

I really had fun designing these and even though they are all circular (or half a circle in some cases) in design, they are all different.  The handles are different, the closures are different.    The bags are made by first crocheting 2 like circles (or hexagon as in the case of #1) and then the joining, closure and strap are all done in one go.

I really hope she likes them, I sure do.


These are what I came up with.

This army green yarn was so easy to work with, and the purse was even easier to make.  It just needs a contrasting colour button and you're ready for a night on the town.

This variegated yarn was the first one I made something with as it's so pretty.  This purse is the 3rd piece made out of the yarn.  Its design to close with a single small button at the centre of the front of the bag.

This yarn was my least favourite as it felt a bit rough.

With this design, I really wanted a little more dimension.

This bag was completed with the wrong side showing as I thought it gave the bag a more stylish look.

This yarn though pretty was my second least favourite as it too was a bit rough.

Now here's #1.  It's the very first one made.  If you look a bit closer you'll see its not really a circle it is a Hexagon. 

This one took me back to basic.

I really love how these colours compliment each other, what do you think?


Now here's our basic wristlet.

My Halfmoon.  This at the time was my favourite, until........

With the ease of the yarn to work with this became my ultimate favourite.

These pictures, though taken in natural light, honestly do not show the true beauty that they actually are.  I truly enjoyed making each and every one of them.  There's just something about seeing your thought/vision come to life.  They even brought other future ventures into perspective, so just wait and see...

The bags were delivered, she barely scan them and said "they are nice".... That left me wondering, does she really liked them?.... I left unsure.... But reassurance came when she sent me a voice vote.  I felt elated as she really liked them.

Now that's a crafter's dream.... To have others, not just themselves loving their creations.

Ruffle Hat

Hi loves Have you seen those hats that are taking the internet by storm? They're all over TikTok, Instagram, and YouTube, and I just had...